Docker stack 如何一键编排Inmp?【linux云计算+运维开发】
更新时间:2020年04月29日16时08分 来源:传智播客 浏览次数:
环境要求
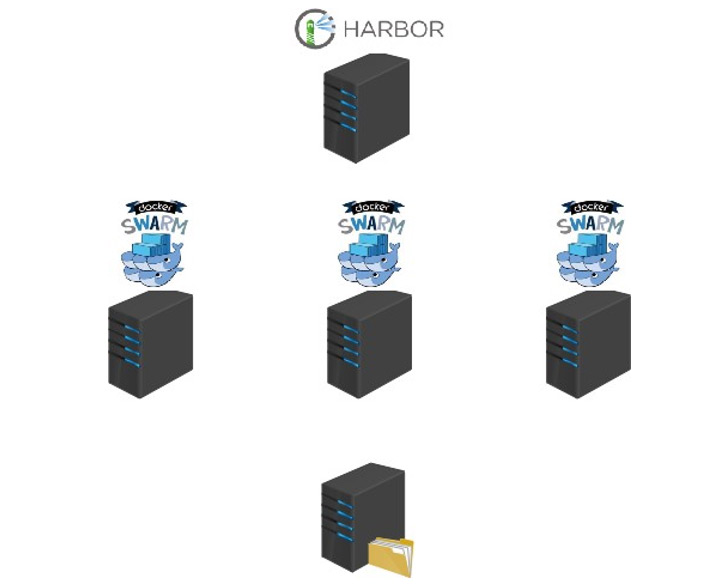
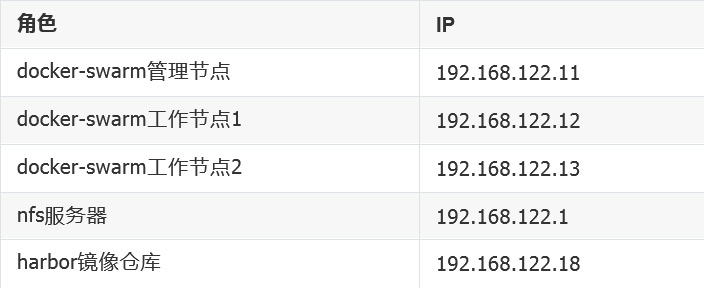
1、配置nfs存储卷
(1)在docker swarm集群中所有节点都确认安装nfs客户端软件
# yum install nfs-utils rpcbind -y
(2)在192.168.122.1 上搭建nfs,共享目录给docker swarm集群中所有节点挂载
[root@nfs ~]# mkdir /opt/dockervolume
[root@nfs ~]# vim /etc/exports
/opt/dockervolume *(rw,no_root_squash,sync)
[root@nfs ~]# systemctl restart rpcbind nfs-server
[root@nfs ~]# systemctl enble rpcbind nfs-server
(3)在docker swarm集群中所有节点创建存储卷,并验证。
# docker volume create --driver local --opt type=nfs --opt o=addr=192.168.122.1,rw --opt device=:/opt/dockervolume
nginx_volume
# docker volume ls |grep nginx_volume
local nginx_volume
# docker volume inspect nginx_volume
[
{
"CreatedAt": "2019-06-12T13:24:09+08:00",
"Driver": "local",
"Labels": {}, "Mountpoint":
"/var/lib/docker/volumes/nginx_volume/_data", "Name": "nginx_volume",
"Options": {
"device": ":/opt/dockervolume", "o": "addr=192.168.122.1,rw",
注意这里的挂载参数要有
"type": "nfs"
},
"Scope": "local"
}
2、下载镜像
在任意能上外网的机器上操作
[root@nfs ~]# docker pull richarvey/nginx-php-fpm
3、准备是相关配置文件
[root@nfs ~]# mkdir /root/discuz/dockerfile -p
[root@nfs ~]# cd /root/discuz/dockerfile
准备nginx主配置文件
[root@nfs dockerfile]# vim nginx.conf user nginx;
worker_processes auto;
error_log /var/log/nginx/error.log warn;
pid /var/run/nginx.pid;
events {
use epoll;
worker_connections 65535;
}
http {
include /etc/nginx/mime.types;
default_type application/octet-stream;
log_format main '$remote_addr - $remote_user [$time_local] "$request" '
'$status $body_bytes_sent
"$http_referer" '
'"$http_user_agent" "$http_x_forwarded_for"';
access_log
sendfile #tcp_nopush
/var/log/nginx/access.log on;
on;
main;
keepalive_timeout 65; #gzip on;
include /etc/nginx/conf.d/*.conf;
}
准备nginx子配置文件
[root@nfs dockerfile]# vim web.conf server {
listen 80; server_name _;
index index.php index.html; root /var/www/html;
location ~ \.php$ {
fastcgi_pass 127.0.0.1:9000; fastcgi_index index.php; fastcgi_param SCRIPT_FILENAME
$document_root$fastcgi_script_name; include fastcgi_params;
}
}
准备时区文件
[root@nfs dockerfile]# cp /etc/localtime .
准备php-fpm子配置文件
[root@nfs dockerfile]# vim php-fpm-www.conf [www]
user = nginx group = nginx
listen = 127.0.0.1:9000
pm = dynamic pm.max_children = 64
pm.start_servers = 20
pm.min_spare_servers = 5
pm.max_spare_servers = 35
pm.max_requests = 500
rlimit_files = 1024
4、准备镜像
编写Dockerfile
[root@nfs dockerfile]# vim dockerfile FROM richarvey/nginx-php-fpm
MAINTAINER daniel@itcast.cn
RUN echo 'Asia/Shanghai' > /etc/timezone && rm -f
/etc/nginx/nginx.conf && rm -f /usr/local/etc/php- fpm.d/www.conf
COPY localtime /etc/localtime
COPY nginx.conf /etc/nginx/nginx.conf COPY web.conf /etc/nginx/conf.d/web.conf
COPY php-fpm-www.conf /usr/local/etc/php-fpm.d/www.conf
CMD /usr/sbin/nginx -c /etc/nginx/nginx.conf &&
/usr/local/sbin/php-fpm -c /usr/local/etc/php-fpm.conf
构建镜像
[root@nfs dockerfile]# docker build -f dockerfile -t 192.168.122.18/library/nginx-php-fpm:v1 .
上传镜像到harbor
[root@nfs dockerfile]# docker login 192.168.122.18
[root@nfs dockerfile]# docker push
192.168.122.18/library/nginx-php-fpm:v1
5、编排docker stack
编写YMAL文件
在docker swarm集群中的管理节点进行操作
[root@manager ~]# cat discuz.yml
version: '3'
services:
db:
image: 192.168.122.18/library/mysql:5.7 environment:
MYSQL_ROOT_PASSWORD: 123
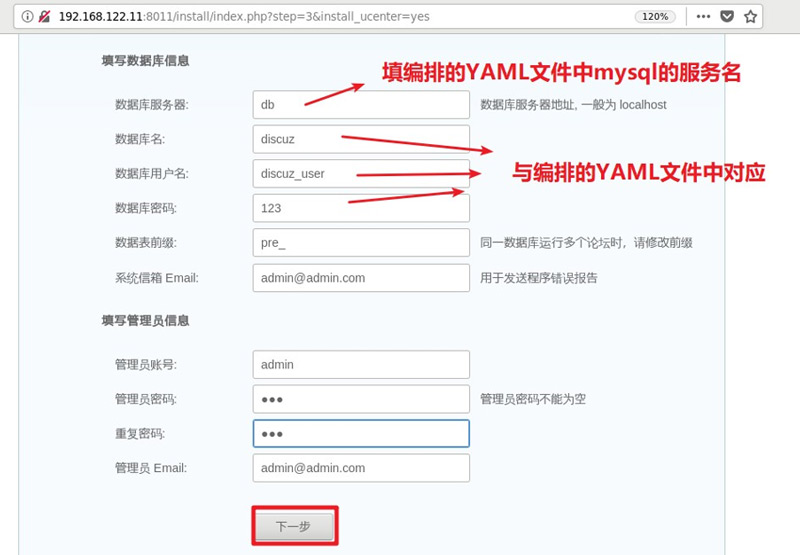
MYSQL_DATABASE: discuz
MYSQL_USER: discuz_user MYSQL_PASSWORD: 123
deploy:
replicas: 1
nginx-php:
image: 192.168.122.18/library/nginx-php-fpm:v1
depends_on:
- db
ports:
- "8011:80"
volumes:
- "nginx_volume:/var/www/html"
deploy:
replicas: 1
volumes:
nginx_volume:
driver: local
driver_opts:
type: "nfs"
o: "addr=192.168.122.1,rw"
device: ":/opt/dockervolume"
一键发布stack
[root@manager ~]# docker stack deploy -c discuz2.yml discuz
Creating network discuz_default
Creating service discuz_db
Creating service discuz_nginx-php
6、拷贝discuz代码到nfs共享
在nfs服务器上操作
[root@nfs dockerfile]# git clone
https://gitee.com/ComsenzDiscuz/DiscuzX.git
[root@nfs dockerfile]# cp DiscuzX/upload/* /opt/dockervolume/
-rf
cp: overwrite '/opt/dockervolume/index.php'? y
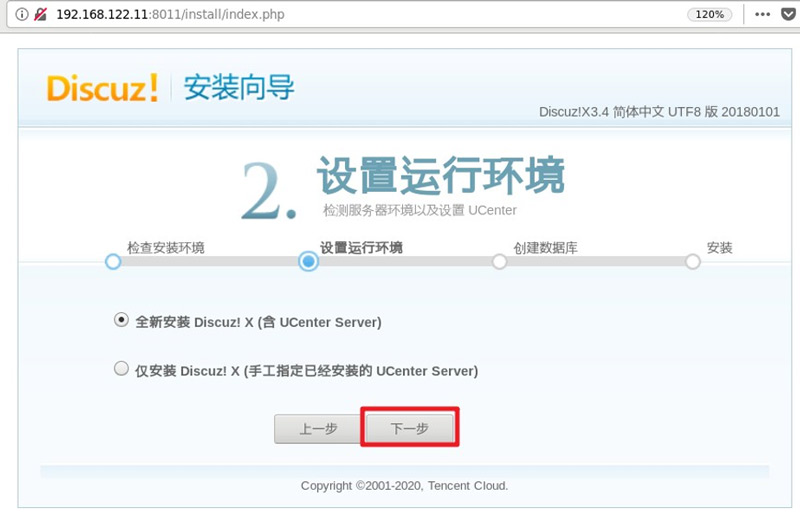
7, 通过浏览器安装
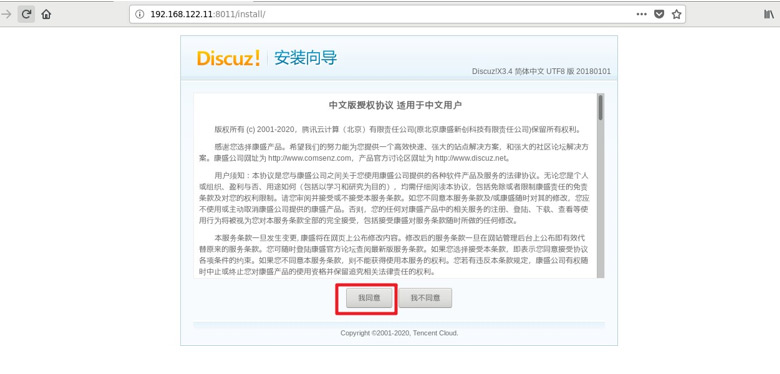
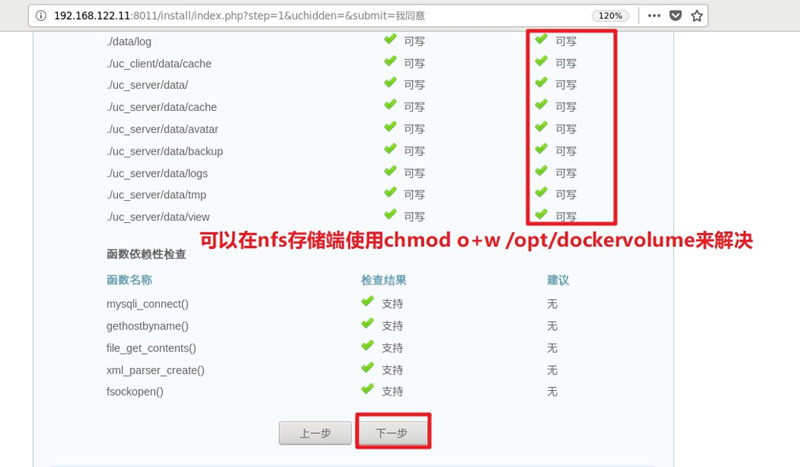
[root@nfs dockerfile]# chmod o+w -R /opt/dockervolume/
上图少了-R参数,请加上


猜你喜欢:


 AI智能应用开发
 AI大模型开发(Python)
 AI鸿蒙开发
 AI嵌入式+机器人开发
 AI大数据开发
  AI运维
AI运维 AI测试
AI测试 跨境电商运营
 AI设计
AI设计 AI视频创作与直播运营
 微短剧拍摄剪辑
 C/C++
C/C++ 狂野架构师
狂野架构师


